
I. Introduction
Removing a bike pedal can be a frustrating experience, especially for those who are inexperienced in bike maintenance. However, knowing how to remove a bike pedal is a vital skill that every rider should have. Whether you are changing the pedals, lubing the threads, or replacing a worn-out pedal, removing the current pedal is often the first step in the process. This article provides a step-by-step guide on how to remove a bike pedal, along with helpful tips to make the process easier and more efficient.
II. Step-by-Step Guide: How to Remove a Bike Pedal
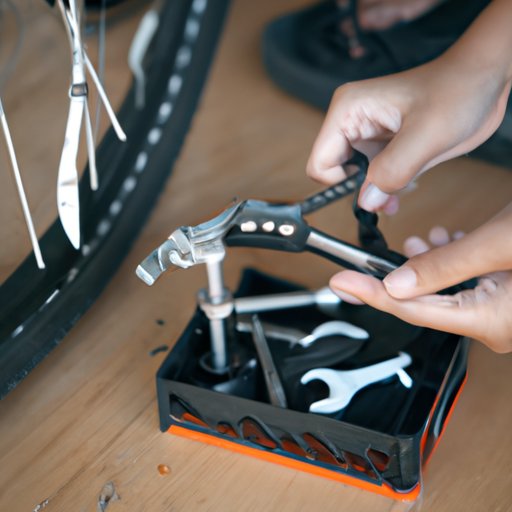
Before you start this process, you will need a few tools. These tools include a pedal wrench and a wrench or Allen key that fits the crank bolt. A pedal wrench is a thin offset wrench that fits between the crank arm and the pedal. This wrench allows you to remove the pedal without damaging the threads.
The process of removing the bike pedal is straightforward and can be broken down into four simple steps:
- Loosen the pedal
- Unscrew the pedal
- Repeat on the other side
- Clean and reassemble
Start by locating the pedal wrench and the appropriate wrench or Allen key. Position the bike so that the pedal you want to remove is at the bottom of the pedal stroke and facing forward. Use the wrench to loosen the pedal by turning it counterclockwise. You only need to perform a quarter turn to loosen the pedal.
Next, unscrew the pedal from the crank arm by using your hands to turn it counterclockwise until it is completely removed. Repeat the process on the other side using the same steps.
Once you have successfully removed both pedals, clean and reassemble them. Use a durable rag to clean the pedals and crank arm, being careful to remove any dirt or grime caked on the pedal threads. Before reassembling, apply a small amount of grease or anti-seize to the pedal threads, making it easier to remove the pedals next time.
Remember to always make sure that you are turning the correct way; the left pedal is left-threaded and must be turned clockwise to loosen, while the right pedal is right-threaded and must be turned counterclockwise to loosen.

III. DIY Bike Maintenance: Removing Your Bike Pedal with Basic Tools
If you don’t have access to a pedal wrench, you can still remove the bike pedal using basic tools. First, locate the appropriate wrench or Allen key that fits the crank bolt. Place the wrench over the flat side of the crank and hold it securely in place while you loosen the pedal with a regular box-end wrench.
Alternatively, you can use a crescent wrench if you don’t have a box-end wrench. However, be careful not to slip and damage the crank arm while using this method.
While this method can be used in a pinch, it is always recommended to use the correct tools whenever possible. A pedal wrench is designed specifically for this purpose and will make the process easier and more efficient.

IV. No Lube Needed: Removing a Bike Pedal Without Ruining Your Crank Arm
One common problem that many riders experience when removing a bike pedal is damaging the crank arm. This can happen if the pedal is seized or corroded onto the threads. Attempting to remove the pedal forcefully can cause irreparable damage to the crank arm, leaving you with costly repairs.
The best way to avoid this problem is to avoid forcing the pedal. Instead, apply some heat to the pedal first and try to loosen it using a pedal wrench. Heat works by expanding the metal, causing it to loosen up slightly and make it easier to remove the pedal.
Another solution is to use a penetrating oil such as WD-40. This oil penetrates the corroded threads and frees them up, making the pedal easier to remove. Apply some of this oil to the threads, wait a few minutes, and then try to remove the pedal with a pedal wrench.
V. How to Take Off a Worn-Out Bike Pedal in 5 Simple Steps
Removing a worn-out bike pedal can pose special challenges since it may be more difficult to loosen the pedal. Follow these 5 simple steps to remove a worn-out bike pedal:
- Use a penetrating oil
- Apply heat
- Use a pedal wrench
- Wrap a cloth around the pedal
- Use a pipe wrench
If the pedal is still not budging, wrap a cloth around the pedal and use a pipe wrench to gain leverage. This should make it easier to loosen the pedal and remove it.
VI. The Quick and Easy Method: Removing a Bike Pedal in Under 30 Seconds
If you’re looking for a quick and efficient way to remove a bike pedal, look no further than this method. Follow these steps to remove a pedal in under 30 seconds:
- Position the pedal wrench
- Tap the pedal wrench with mallet
- Unscrew the pedal
- Repeat on the other side
Start by positioning the pedal wrench between the pedal and the crank arm. Use a mallet or hammer to give the wrench a sharp tap, causing the pedal to loosen. Next, simply unscrew the pedal by turning it counterclockwise using your hand. Repeat this process on the other pedal.
While this process can be done in under 30 seconds, it is important to take your time and not rush. This will help you avoid any potential damage to your bike or tools.
VII. Do-It-Yourself Tips: Removing a Stuck Bike Pedal with Household Items
If you find yourself struggling to remove a bike pedal with normal bike tools, you can use common household items to get the job done. Here are some tips:
- Use a rubber band: Place a rubber band between the pedal and the crank arm to get a better grip when loosening the pedal.
- Use a jar opener: A jar opener can provide extra grip when turning a stubborn pedal, allowing you to apply more force without damaging the threads.
- Use a wrench and a hammer: Position the wrench on the flat side of the crank, and then give the wrench a sharp tap with a hammer. This can help loosen the pedal and make it easier to remove.
VIII. Don’t Break Your Bike: Removing a Pedal Using Proper Technique and Tools
Using proper technique and tools is crucial when removing a bike pedal. Here are some guidelines:
- Use a pedal wrench: A pedal wrench is designed specifically for removing bike pedals and will help prevent damage to the threads.
- Be careful not to cross-thread: Always make sure that you are turning the pedal in the correct direction and that it is going on straight.
- Avoid excessive force: Forcing the pedal can damage the threads or the crank arm. Be patient and use gentle pressure when removing the pedal.
IX. Conclusion
Removing a bike pedal may seem daunting, but with the right tools and techniques, it can be a straightforward process. Practice these tips and tricks to make the process easier and more efficient. Whether you’re a seasoned mechanic or an inexperienced cyclist, knowing how to remove a bike pedal is a necessary skill for every rider.
Remember to always use proper technique and tools, and be patient when removing the pedal. Practicing bike maintenance skills will help you get the most out of your ride and ensure that your bike lasts for years to come.