
Introduction
Baking makeup is a popular technique used by makeup artists and beauty enthusiasts alike to achieve a flawless and long-lasting look. But what exactly is baking makeup? Baking makeup involves applying thick layers of powder and setting it with a heat source such as a blow dryer or oven. This process allows the powder to sink into your skin and create a smooth and even surface. The result is a look that will last all day and night without any need for touch-ups.

A Guide to Baking Your Makeup for a Long Lasting Look
The key to achieving a perfect baked makeup look is preparation. Here are some tips on how to prepare your skin before you start baking:
Preparing the Skin
Before you begin baking, it’s important to make sure your skin is properly prepped. Start by cleansing your face with a gentle cleanser and then apply a moisturizer to keep your skin hydrated. You should also use an oil-free primer to help your makeup stay in place.
Applying the Foundation
Once your skin is prepped, it’s time to apply your foundation. Choose a foundation that matches your skin tone and apply it using a damp sponge. Make sure you blend it evenly across your face to ensure a seamless finish.
Setting with Powder
Once your foundation is applied, it’s time to set it with a loose powder. Use a fluffy brush to lightly dust your face with the powder. This will help absorb any excess oil and give you a matte finish.
Baking with Translucent Powder
After you have set your foundation with powder, it’s time to bake. Take a generous amount of translucent powder and press it into your skin. Focus on areas that tend to get oily such as your T-zone and under your eyes. Leave the powder on for 10-15 minutes and then dust off the excess.

How to Achieve Flawless Skin with Baked Makeup Techniques
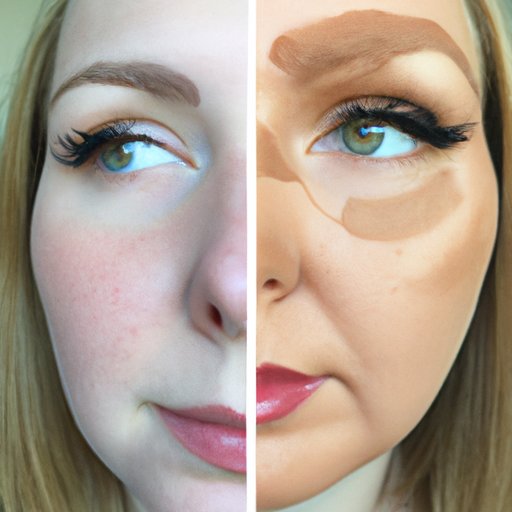
Once your base is set, you can move onto concealing, contouring, and highlighting. For concealing, use a concealer that matches your skin tone and apply it to any blemishes or dark circles. For contouring and highlighting, use a cream or powder product and apply it to the areas you want to highlight and contour. Finally, take a blush and apply it to the apples of your cheeks for a natural flush of color.
Tips and Tricks for Perfectly Baked Makeup
When it comes to baking makeup, there are a few things you should keep in mind:
Use the Right Tools
Using the right tools is essential to achieving a perfect baked makeup look. Invest in quality makeup brushes and sponges so that you can apply your products evenly and seamlessly.
Don’t Overbake
It’s important not to overbake your makeup. Too much powder can lead to a cakey and unnatural finish.
Check the Undertones
Make sure you choose a foundation, concealer, and powder that match your skin’s undertone. This will help you achieve a more natural and flawless look.
An In-Depth Look at the Process of Baking Makeup
If you’re new to baking makeup, here is a step-by-step guide to help you achieve the perfect look:
Step-by-Step Instructions
1. Prep your skin by cleansing and moisturizing.
2. Apply foundation, focusing on areas that tend to get oily.
3. Set your foundation with a loose powder.
4. Take a generous amount of translucent powder and press it into the skin.
5. Let the powder sit for 10-15 minutes.
6. Dust off the excess powder.
7. Conceal any blemishes or dark circles.
8. Contour and highlight the face.
9. Apply blush to the apples of your cheeks.
Common Mistakes to Avoid
• Applying too much powder
• Not using the right tools
• Choosing the wrong shade of foundation
• Not blending the products properly

A Comprehensive Overview of Baking Makeup for Beginners
Are you just getting started with baking makeup? Here’s a comprehensive overview of everything you need to know:
What You Need to Get Started
To get started with baking makeup, you’ll need to invest in a few essential items: a quality foundation, concealer, powder, and brushes. You’ll also need a heat source such as a blow dryer or oven.
Common Questions Answered
Q: How long should I leave the powder on my face?
A: Generally speaking, you should leave the powder on your face for 10-15 minutes before dusting off the excess.
Q: Is baking makeup bad for my skin?
A: No, baking makeup is not bad for your skin. In fact, it can help keep your makeup looking fresh and flawless all day long.
Q: What type of powder should I use?
A: It’s best to use a translucent powder when baking your makeup. This type of powder won’t add any color to your face and will help set your makeup in place.
Conclusion
Baking makeup is a great way to achieve a flawless and long-lasting look. With the right tools and techniques, you can easily create a beautiful, polished look that will last all day. Whether you’re a beginner or an experienced makeup artist, baking makeup is an essential skill to master.
Summary of Benefits
• Helps create a smooth and even surface
• Allows makeup to stay in place all day
• Enhances the look of contouring and highlighting
• Gives the skin a healthy and natural glow
Final Thoughts
Baking makeup is a great way to achieve a perfect and long-lasting look. With the right tools and techniques, you can easily master the art of baking makeup and create stunning looks that will last all day.