
Introduction
Having a working dryer is essential for many households. But in order for your dryer to work properly, it needs to be connected to the right type of outlet. Many older homes may have a three prong outlet for their dryer, but most newer appliances require a four prong outlet. In this article, we will look at what steps are needed to wire a three prong dryer outlet.
Step-by-Step Guide to Wiring a 3 Prong Dryer Outlet
Wiring a three prong dryer outlet can be a complicated process. To ensure that you do it correctly, it’s important to follow a few key steps.
Preparation
Before you begin wiring your dryer outlet, you should check the voltage and amperage requirements of your appliance. Make sure that the outlet you are wiring is rated for the same voltage and amperage as your appliance. Also, make sure that the wires you will be using are rated for the same voltage and amperage.
Safety Precautions
It’s essential to take all necessary safety precautions when wiring an outlet. Be sure to turn off the power to the outlet before beginning any wiring. You should also wear protective gear, such as gloves and safety glasses, while doing any electrical work.
Materials Needed
In order to wire a three prong dryer outlet, you will need the following materials:
- Wire strippers
- Screwdriver
- Electrical tape
- Three prong dryer outlet
- Appropriately rated wire
The Process
Once you have gathered all the necessary materials, you can begin the process of wiring the three prong dryer outlet. Here are the steps to follow:
Preparing the Outlet
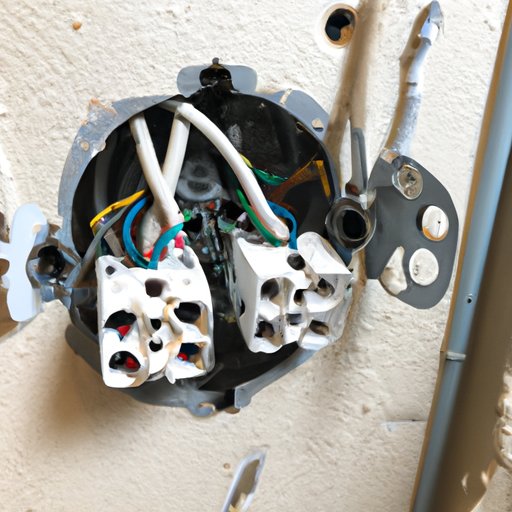
Start by preparing the outlet box. Remove the cover plate and unscrew the outlet from the box. Once the outlet is removed, you can begin wiring it.
Installing the Outlet
Next, connect the ground wire to the green grounding screw on the outlet. Attach the black wire to the brass terminal on the outlet, and the white wire to the silver terminal. Finally, attach the red wire to the other brass terminal.
Connecting the Wires
Once all the wires are connected to the outlet, you can begin connecting them to the circuit breaker. Connect the black wire to the breaker’s hot bus bar, and the white wire to the neutral bus bar. Finally, connect the ground wire to the ground bus bar.
Testing and Securing the Connection
Once all the wires are connected, you can test the connection. Plug in a lamp or another device to the outlet to make sure that it works. If the device turns on, then the connection is secure. Finally, secure the outlet to the box with the screws, and replace the cover plate.
Tips on Wiring a Three Prong Dryer Outlet
When wiring a three prong dryer outlet, there are a few tips to keep in mind. Here are some of the most important ones:
Measure Twice, Cut Once
When wiring an outlet, it’s important to measure twice and cut once. This will help you avoid costly mistakes. Take your time and double check your measurements before cutting any wires.
Choose the Right Wire and Outlet
Make sure to choose the appropriate wire and outlet for the job. The wire should be rated for the same voltage and amperage as the appliance you are connecting it to. The same goes for the outlet.
Test Your Work
After wiring the outlet, it’s important to test it to make sure that it is working properly. Plug in a device to the outlet to see if it turns on. If it does, then the connection is secure.

A Comprehensive Guide to Wiring a 3 Prong Dryer Outlet
Wiring a three prong dryer outlet can seem like a daunting task. But with a little knowledge and patience, it can be done safely and correctly. Here is a comprehensive guide to wiring a three prong dryer outlet:
Understanding the Basics
Before attempting to wire a three prong dryer outlet, it’s important to understand the basics. The most important thing to remember is that electricity is dangerous and can cause serious injury or death if not handled properly. It’s also important to make sure that the outlet is rated for the same voltage and amperage as the appliance you are connecting it to.
Connecting the Wires
Once you have all the necessary materials, you can begin connecting the wires. Start by connecting the ground wire to the green grounding screw on the outlet. Then connect the black wire to the brass terminal, the white wire to the silver terminal, and the red wire to the other brass terminal.
Finishing Touches
Finally, connect the wires to the circuit breaker. Connect the black wire to the breaker’s hot bus bar, the white wire to the neutral bus bar, and the ground wire to the ground bus bar. After that, all that’s left to do is test the connection and secure the outlet to the box.

Troubleshooting and Repairing a 3 Prong Dryer Outlet
If you encounter any problems while wiring your three prong dryer outlet, there are a few steps you can take to try and fix the problem. Here are the steps to troubleshoot and repair a three prong dryer outlet:
Identifying and Locating the Problem
The first step is to identify and locate the problem. Check the outlet and wires for any signs of damage or loose connections. If you find any, then you will need to repair or replace the affected parts.
Taking the Necessary Steps to Fix the Problem
Once you have identified the problem, you can take the necessary steps to fix it. This could involve repairing or replacing damaged parts, tightening loose connections, or rewiring the outlet. Always make sure to follow safety precautions when doing any electrical work.
Testing the Repaired Outlet
Once the problem has been fixed, you can test the outlet to make sure it is working properly. Plug in a device to the outlet to see if it turns on. If it does, then the connection is secure.
Conclusion
Wiring a three prong dryer outlet can seem intimidating at first, but with a little knowledge and patience, you can do it safely and correctly. We hope this article has provided you with the information you need to tackle this project with confidence.