
Introduction
Reupholstering a wingback chair is a great way to give an old piece of furniture new life. It is also an economical option compared to buying brand new furniture. There are a few important steps to take when reupholstering a wingback chair, and some considerations to keep in mind before starting. In this article, we’ll explore the steps involved in reupholstering a wingback chair, what you need to know before starting and tips and tricks for success. We’ll also look at the cost of reupholstering a wingback chair and provide a DIY tutorial for those who want to tackle the project themselves.
Step-by-Step Guide to Reupholstering a Wingback Chair
Reupholstering a wingback chair can seem like a daunting task, but with the right tools and materials, it’s really quite easy. Here is a step-by-step guide to help you get started:
Preparing the Wingback Chair
The first step is to prepare the chair by removing any buttons, tacks or nails that may be attached to the frame. Use a flat head screwdriver to remove the buttons and a tack puller to remove the tacks and nails. Once all of the hardware has been removed, use a vacuum cleaner to remove any dust and debris from the frame.
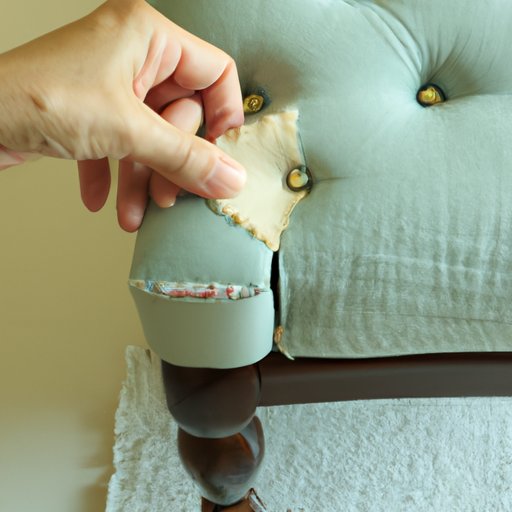
Removing the Old Fabric
Next, you will need to remove the old fabric from the chair. Start by cutting the fabric along the seams and then peeling it off. If there is any excess glue or adhesive on the frame, use a solvent to remove it. Once the fabric has been removed, inspect the frame for any damage or wear and tear.
Applying New Padding and Fabric
Once the frame has been inspected, it’s time to apply the new padding and fabric. Start by applying a layer of foam padding to the frame. Make sure the padding is cut to the correct size and that it is securely attached to the frame. Next, cover the padding with your chosen fabric and secure it to the frame using staples or upholstery nails. For extra security, you can also use upholstery tacks or glue.
Finishing Touches
The final step is to add any finishing touches to the chair. This could include adding trim, buttons or other decorative elements to the fabric. Once everything is in place, give the chair a thorough inspection to make sure everything is secure and correctly placed.

What You Need to Know Before Reupholstering a Wingback Chair
Before you begin reupholstering a wingback chair, there are a few things you need to consider. Here are some important tips to keep in mind:
Choosing the Right Tools and Materials
It’s important to choose the right tools and materials for the job. Make sure you have a good quality staple gun, upholstery nails, tack puller, scissors, foam padding and fabric. You may also need a solvent to remove any excess glue or adhesive.
Understanding the Importance of Measurements
Accurate measurements are essential when reupholstering a wingback chair. Take the time to measure the frame and the fabric so that you can ensure that the fabric is cut to the correct size.
Determining the Condition of the Frame
It’s also important to inspect the frame of the chair before you begin. Look for any signs of damage or wear and tear, and if necessary, repair or replace any broken parts.
Tips and Tricks for Reupholstering a Wingback Chair
Here are a few tips and tricks to help you get the best results when reupholstering a wingback chair:
Using Staples Instead of Nails
Staples are much easier to use than nails, and they can provide a more secure hold. Make sure to use a good quality staple gun and to space the staples evenly around the frame.
Making Sure the Fabric Is Centered Correctly
When attaching the fabric to the frame, make sure it is centered correctly. This will ensure that the fabric is even and that there are no gaps or wrinkles.
Taking Extra Care When Applying the Fabric
Take your time when applying the fabric to the frame. Make sure the fabric is stretched tightly and that the pattern is straight. Also, make sure to avoid stretching the fabric too much, as this can cause it to tear.
How to Choose the Right Fabric for Reupholstering a Wingback Chair
Choosing the right fabric for your wingback chair can be a challenge, but there are a few things to keep in mind. Here are some tips for choosing the perfect fabric for your project:
Considering Durability
Durability is key when selecting fabric for your wingback chair. Choose a fabric that is strong and durable enough to withstand regular use. Natural fibers such as cotton and linen are usually the best choice.
Evaluating the Pattern and Color
The pattern and color of the fabric should complement the style of the chair. Consider the other colors in the room and choose a fabric that will blend in nicely. Patterns can also be used to add visual interest to the chair.
Thinking About Texture
Texture is another important factor to consider. Choose a fabric that is comfortable to the touch and that won’t be too hot or cold. Velvet, suede and leather are all good choices.

Common Mistakes to Avoid When Reupholstering a Wingback Chair
Reupholstering a wingback chair can be tricky, and there are a few common mistakes to avoid. Here are some mistakes to watch out for:
Not Measuring Properly
Accurate measurements are essential when reupholstering a wingback chair. Make sure to measure the frame and the fabric so that you can ensure that the fabric is cut to the correct size.
Not Using Enough Padding
It’s important to use enough padding to provide support and comfort. Too little padding can make the chair uncomfortable to sit on, while too much can make it look bulky.
Not Using the Right Tools
Make sure to use the right tools for the job. A good quality staple gun, upholstery nails, tack puller, scissors, foam padding and fabric are all essential for a successful project.
DIY Reupholstering: A Wingback Chair Tutorial
If you’re feeling confident about tackling the project yourself, here is a step-by-step tutorial for reupholstering a wingback chair:
Gather the Necessary Supplies
Start by gathering the necessary supplies, including a staple gun, upholstery nails, tack puller, scissors, foam padding and fabric. Make sure to choose a fabric that is durable and comfortable.
Start by Removing the Old Fabric
Begin by removing the old fabric from the chair. Cut the fabric along the seams and then peel it off. Use a solvent to remove any excess glue or adhesive.
Install the Padding and Cut the Fabric
Next, install the foam padding and cut the fabric to the correct size. Make sure the padding is securely attached to the frame.
Attach the Fabric to the Chair
Cover the padding with the fabric and secure it to the frame using staples or upholstery nails. Be sure to stretch the fabric tightly and evenly.
Add the Finishing Touches
Finally, add any finishing touches to the chair, such as trim, buttons or other decorative elements. Give the chair a thorough inspection to make sure everything is secure and correctly placed.

The Cost of Reupholstering a Wingback Chair
The cost of reupholstering a wingback chair depends on a number of factors, including the type of fabric used, the size of the chair, and the complexity of the project. Professional upholsterers typically charge anywhere from $150 to $600 for the job, depending on the size and condition of the chair. If you decide to do the job yourself, the cost of materials can range from $50 to $200.
Conclusion
Reupholstering a wingback chair can be a rewarding and cost-effective project. With the right tools and materials, and a step-by-step guide, it is relatively easy to do. This article provided a comprehensive overview of the process, as well as tips and tricks for success. We also looked at the cost of reupholstering a wingback chair, and provided a DIY tutorial for those who want to tackle the project themselves.