
Introduction
A dryer heating element is an essential component of a clothes dryer. It is responsible for providing heat to the drum so that the clothes can dry. If the heating element fails, it needs to be replaced as soon as possible in order to make sure your dryer is functioning properly. In this article, we will provide a step-by-step guide on how to replace a dryer heating element, as well as some useful tips and troubleshooting advice.
Step-by-Step Guide on How to Replace a Dryer Heating Element
Before you begin, make sure you have all the necessary tools and materials. You will need a Phillips head screwdriver, a pair of needle-nose pliers, a flathead screwdriver, and a new heating element. You may also want to wear protective gear such as safety glasses and gloves.
Step 1: Disconnect the power to the dryer. Unplug the dryer from the wall outlet and turn off the circuit breaker if necessary. This will ensure that there is no power running to the dryer while you are working on it.
Step 2: Remove the back panel of the dryer. Use the Phillips head screwdriver to remove the screws that hold the back panel in place. Once the panel is removed, you should be able to see the heating element.
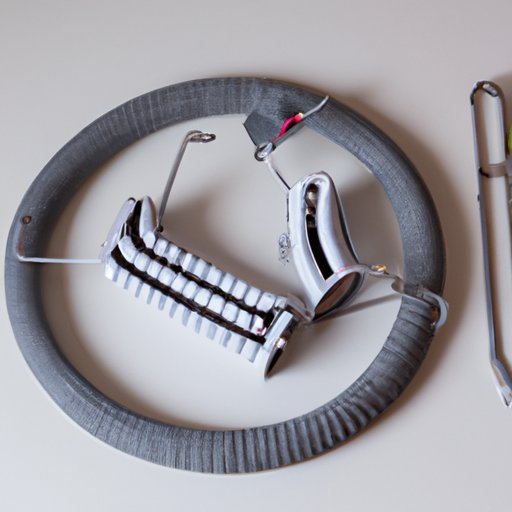
Step 3: Locate the heating element. The heating element is usually located near the bottom of the dryer. Look for a cylindrical or rectangular shaped metal tube with two wires attached to it.
Step 4: Remove the heating element. Use the needle-nose pliers to carefully detach the wires from the heating element. Then use the flathead screwdriver to unscrew the mounting screws that hold the element in place. Once the screws are removed, you can pull the element out of the dryer.
Step 5: Install the new heating element. Slide the new heating element into the same position as the old one. Make sure the wires are secure and reconnect them using the needle-nose pliers. Then use the flathead screwdriver to screw the mounting screws back into place.
Step 6: Reassemble the dryer. Put the back panel back on and use the Phillips head screwdriver to secure it. Make sure all the screws are tight.
Step 7: Connect the power and test the dryer. Plug the dryer back into the wall outlet and turn the circuit breaker back on if necessary. Run the dryer on a test cycle and make sure that it heats up properly.
DIY Tips for Replacing a Dryer Heating Element
When replacing a dryer heating element, it’s important to take your time and follow the steps carefully. Here are some additional tips to help make the process go smoothly:
- Wear protective gear. Safety glasses and gloves are a must when working with electrical components.
- Take photos or draw diagrams as you go. This will help you remember how everything fits together when it comes time to reassemble the dryer.
- Label wiring connections. Label each wire connection so you know which wire goes where when you put the dryer back together.
- Take your time. Rushing through the job can lead to mistakes, so take your time and make sure everything is done correctly.

How to Change a Dryer Heating Element in 8 Easy Steps
Changing a dryer heating element can seem like a daunting task, but it doesn’t have to be. Here is a quick overview of what you need to do:
- Gather the necessary tools and materials.
- Unplug the dryer from its power source.
- Remove the back panel of the dryer.
- Identify the heating element.
- Remove the heating element.
- Install the new heating element.
- Reattach the back panel of the dryer.
- Plug in the dryer and test it.
Troubleshooting Your Dryer’s Heating Element and How to Replace It
If your dryer isn’t heating up properly, it could be due to a faulty heating element. Before you replace it, try these troubleshooting tips:
- Common issues with dryer heating elements. Check for clogged lint filters, broken belts, and other common issues that can cause your dryer not to heat up.
- Testing the dryer heating element. To test the dryer heating element, use an ohmmeter to measure the resistance of the element. If it isn’t within the manufacturer’s specified range, then the element needs to be replaced.
- Replacing the dryer heating element. Follow the steps outlined in this article to replace the heating element in your dryer.

A Guide to Installing a New Dryer Heating Element
Installing a new dryer heating element is a relatively straightforward task. Here are the basic steps you need to follow:
- Setting up the workspace. Clear the area around the dryer and gather the necessary tools and materials.
- Removing the old element. Unplug the dryer from its power source, remove the back panel, and locate the heating element. Use a pair of needle-nose pliers to detach the wires and unscrew the mounting screws.
- Installing the new element. Slide the new heating element into place and reattach the wires. Secure the element with the mounting screws.
- Testing the new element. Reassemble the dryer, plug it back in, and run a test cycle to make sure the element is working properly.
Conclusion
Replacing a dryer heating element is a relatively simple task that most homeowners can do themselves. By following the steps outlined in this article, you can easily replace the heating element in your dryer. The benefits of replacing a dryer heating element include improved performance and increased energy efficiency, which can save you money in the long run.