
Introduction
Replacing the belt on a Kenmore dryer can be a daunting task for many people. While it is a relatively straightforward process, there are some important safety precautions that must be taken into consideration. This article will provide a step-by-step guide on how to replace the belt on a Kenmore dryer and offer helpful troubleshooting tips along the way.
Overview of the Problem
Kenmore dryers are a popular appliance among homeowners due to their reliability and efficiency. Like all appliances, however, they require regular maintenance and repairs. The belt on a Kenmore dryer can become worn or stretched out over time, leading to decreased efficiency and increased wear and tear on the appliance. Replacing the belt is an easy and cost-effective solution to this problem, but it requires some knowledge and skill.
Purpose of the Article
The purpose of this article is to provide a step-by-step guide on how to replace the belt on a Kenmore dryer. We will also provide helpful troubleshooting tips to ensure that the job is done correctly and safely.
Step-by-Step Guide to Replacing a Belt on a Kenmore Dryer
Before beginning the process of replacing the belt on a Kenmore dryer, it is important to have the necessary tools and parts on hand. You will need a Phillips head screwdriver, a pair of needle-nose pliers, a new belt, and a flashlight if needed.
1. Unplug the dryer from the wall
Before beginning any work on the dryer, make sure that it is unplugged from the wall. This is an important safety precaution that should never be ignored.
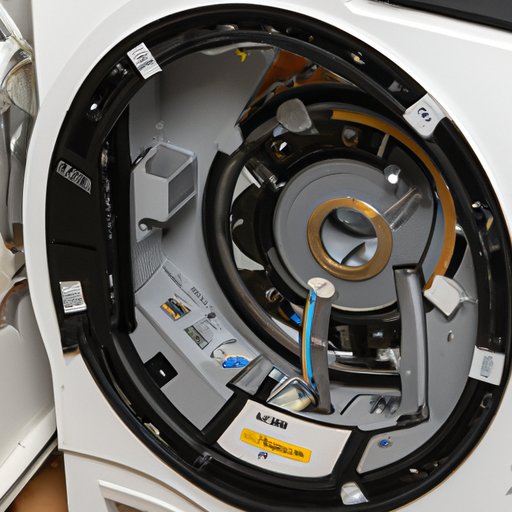
2. Open up the back of the dryer
The back panel of the dryer is held in place with several screws. Use the Phillips head screwdriver to remove these screws and then carefully remove the back panel of the dryer.
3. Remove the old belt
Once the back panel is removed, the old belt should be visible. Use the needle-nose pliers to carefully remove the belt from the motor and idler pulley. Make sure to note the direction of the belt before removing it.
4. Install the new belt
Carefully wrap the new belt around the motor and idler pulley, making sure that it is properly aligned. Once the belt is in place, use the needle-nose pliers to adjust the tension on the belt until it is snug but not too tight.
5. Reassemble the dryer
Once the new belt is installed, reassemble the dryer by replacing the back panel and screws. Make sure that all screws are tightened securely.
6. Plug in and test the dryer
Once the dryer has been reassembled, plug it back in and turn it on. Test the dryer to make sure that it is operating correctly. If everything is working properly, the job is complete.
Troubleshooting Tips for Replacing the Belt on a Kenmore Dryer
When replacing the belt on a Kenmore dryer, it is important to make sure that the belt is properly aligned and that all screws are tight. It is also important to check the tension on the belt to make sure that it is not too loose or too tight. If the belt is too loose, it can slip off the pulleys and cause damage to the dryer. If the belt is too tight, it can put too much strain on the motor and cause premature failure.
Conclusion
Replacing the belt on a Kenmore dryer is a relatively easy process that anyone can do with the right tools and knowledge. Follow the steps outlined in this article and take the necessary safety precautions, and you should be able to complete the job without any problems. As always, make sure to test the dryer after reassembly to ensure that it is working properly.
Summary of Steps
To summarize, here are the steps for replacing the belt on a Kenmore dryer:
1. Unplug the dryer from the wall
2. Open up the back of the dryer
3. Remove the old belt
4. Install the new belt
5. Reassemble the dryer
6. Plug in and test the dryer
Final Tips and Reminders
Finally, here are some important tips and reminders when replacing the belt on a Kenmore dryer:
• Make sure the belt is properly aligned
• Check that all screws are tight
• Ensure the belt is not too loose or too tight
• Test the dryer after reassembly
By following the steps outlined in this article and taking the necessary safety precautions, you should be able to successfully replace the belt on your Kenmore dryer.