
Introduction
Replacing a Moen kitchen faucet is an easy task that can be done in just a few minutes. Whether you’re looking to upgrade your existing faucet or simply replace it due to wear and tear, the process is relatively straightforward. In this article, we’ll provide a step-by-step guide on how to remove a Moen kitchen faucet, as well as expert advice and helpful tips on ensuring a proper fit and seal when installing your new faucet. We’ll also cover troubleshooting tips for loosening stuck nuts and dealing with hard water buildup.
Overview of Moen Kitchen Faucets
Moen is one of the leading manufacturers of kitchen and bathroom fixtures, offering a wide variety of styles and finishes to suit any decor. Their kitchen faucets come in both single-handle and two-handle designs, and feature a pullout spray head for added convenience. Moen faucets are designed to be durable and reliable, and are available in a range of price points to fit any budget.

Benefits of Replacing a Moen Kitchen Faucet
Replacing your Moen kitchen faucet can bring a variety of benefits, including improved functionality, ease of use, and a modern look. A newer model may offer features such as a pullout spray head, touchless operation, or adjustable temperature settings, which can make cooking and cleaning much easier. Additionally, replacing an old, worn-out faucet can help improve the overall look of your kitchen and make it more inviting.
Step-by-Step Guide to Removing a Moen Kitchen Faucet
Removing a Moen kitchen faucet is fairly straightforward. Here’s a step-by-step guide on how to do it:
1. Disconnecting the Water Supply
The first step is to turn off the water supply to the faucet. You can do this by turning off the valves located underneath the sink. If you don’t have valves, you can turn off the main water supply to the house.
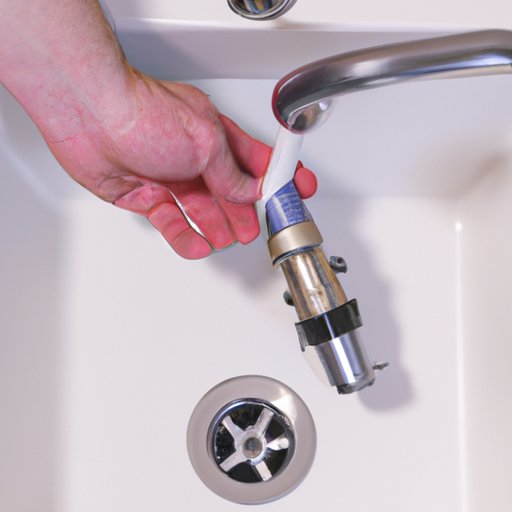
2. Unscrewing the Retaining Nut
Once the water supply is shut off, you’ll need to unscrew the retaining nut that holds the faucet in place. This is usually located at the base of the faucet, and can be unscrewed using a wrench or pliers.
3. Removing the Old Faucet
Once the retaining nut is removed, you can lift the old faucet out of the sink. Be careful not to damage the sink or countertop as you do this.
4. Installing the New Faucet
Now you can start to install the new faucet. Place the faucet into the sink and line up the mounting holes with the holes in the sink. Secure the faucet in place using the retaining nut.
5. Connecting the Water Supply
Finally, you’ll need to connect the water supply to the new faucet. This can be done by connecting the flexible hoses to the valves underneath the sink. Once the hoses are connected, turn the water back on and check for leaks.

DIY Video: How to Easily Remove a Moen Kitchen Faucet
If you prefer to watch a video instead of following written instructions, check out this handy DIY video on how to quickly and easily remove a Moen kitchen faucet. Just follow the steps outlined in the video and you’ll be able to remove your old faucet and install the new one in no time.

How to Uninstall a Moen Kitchen Faucet in 5 Simple Steps
Here’s a quick overview on how to uninstall a Moen kitchen faucet in five easy steps:
1. Shutting Off the Water Supply
First, turn off the water supply to the faucet. This can be done by turning off the valves located underneath the sink. If there are no valves, you can turn off the main water supply to the house.
2. Removing the Handle
Next, remove the handle from the faucet. This can be done by unscrewing the set screws located beneath the handle. Once the screws are removed, you can lift the handle away from the faucet.
3. Unscrewing the Retaining Nut
Next, you’ll need to unscrew the retaining nut that holds the faucet in place. This is usually located at the base of the faucet, and can be unscrewed using a wrench or pliers.
4. Pulling the Faucet Out
Once the retaining nut is removed, you can lift the old faucet out of the sink. Be careful not to damage the sink or countertop as you do this.
5. Installing the New Faucet
Now you can begin to install the new faucet. Place the faucet into the sink and line up the mounting holes with the holes in the sink. Secure the faucet in place using the retaining nut.
Make It Easy: How to Take Out a Moen Kitchen Faucet
Getting the old faucet out can sometimes be a challenge, especially if it has been in place for a long time. To make things easier, try using a bit of leverage and pressure to loosen the retaining nut. You can also try applying some lubricant to the threads of the nut to make it easier to unscrew.
Expert Advice: A Pro’s Guide to Replacing a Moen Kitchen Faucet
When replacing a Moen kitchen faucet, it’s important to make sure you have all the necessary tools and supplies. Make sure you have the right size wrenches and pliers to remove the retaining nut, as well as a screwdriver to remove the handle. Also, make sure to properly seal and connect the water supply lines to avoid leaks.
Troubleshooting Tips for Removing a Moen Kitchen Faucet
If you’re having trouble removing the old faucet, here are some troubleshooting tips to help you out:
1. Loosening Stuck Nuts
If the retaining nut is stuck, try using a bit of leverage and pressure to loosen it. You can also try applying some lubricant to the threads of the nut to make it easier to unscrew.
2. Dealing with Hard Water Buildup
Hard water buildup can also cause problems when trying to remove a faucet. Try using a wire brush or vinegar to clean off any buildup around the retaining nut. This will make it easier to unscrew.

Quickly Replace Your Moen Kitchen Faucet with These Handy Tips
Replacing your Moen kitchen faucet can be done quickly and easily with these handy tips:
1. Making Sure You Have All the Necessary Parts
Before you begin, make sure you have all the parts and tools you need. This includes the new faucet, wrenches, pliers, and a screwdriver. You should also make sure you have the correct size wrenches and pliers for the job.
2. Ensuring a Proper Fit
When installing the new faucet, make sure to line up the mounting holes with the holes in the sink. This will ensure a proper fit and seal when connecting the water supply lines.
Conclusion
Replacing a Moen kitchen faucet is an easy task that can be done in just a few minutes. Following the steps outlined in this article, you can quickly and easily remove the old faucet and install the new one. Be sure to use the right tools and supplies, and take care to ensure a proper fit and seal when connecting the water supply lines. With these tips, you can quickly and easily replace your Moen kitchen faucet.