
Introduction
Pillar candles are an attractive and popular type of candle that can be used for a variety of occasions. These candles stand upright on their own, without the need for a holder or base. Pillar candles come in a range of sizes and colors and can easily be customized with decorations and scents. Creating your own pillar candles is a fun and rewarding process, and with a few simple steps, you can create beautiful candles to enjoy or give away as gifts.
Step-by-Step Tutorial on How to Make Pillar Candles
The following tutorial provides the basics for making pillar candles. Before beginning, it’s important to gather all of the necessary supplies and equipment to ensure a successful project.
Gather Supplies and Equipment
Before attempting to make pillar candles, make sure you have all the necessary supplies and equipment on hand. You will need wax, molds, wicks, a thermometer, safety gear, and any decorations or fragrances you wish to use. Make sure to select wax that is specifically designed for candle making.
Prepare the Wax
Once you have all the necessary supplies, it’s time to begin preparing the wax. Start by heating the wax until it reaches a temperature of 160°F (71°C). As the wax melts, stir it occasionally to ensure it is evenly heated. Once the wax has reached the desired temperature, add any colorants, fragrances, or other additives.
Pour the Wax
Once the wax has been prepared, it is ready to be poured into the mold. Slowly pour the wax into the mold, taking care to not overfill it. Allow the wax to settle before adding more. If you plan to add decorations, such as glitter or beads, do so before the wax has cooled. Once the wax has cooled, the decoration will be trapped inside.
Allow the Candle to Cool and Set
Once the wax has been poured into the mold, allow it to cool and set. This may take up to 24 hours, depending on the size of the candle. During this time, it is important to keep the area ventilated and free from drafts.
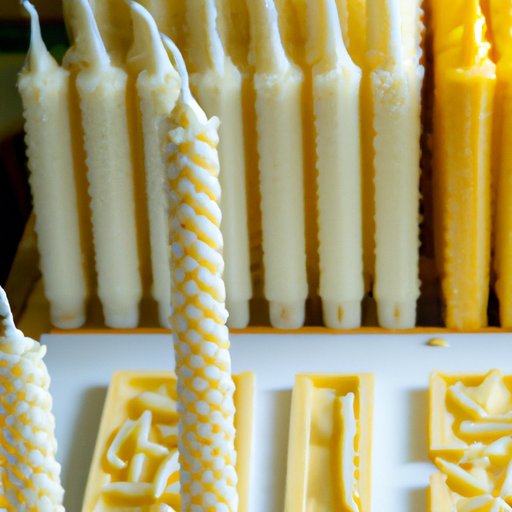
Remove the Mold
Once the candle has cooled and set, it is time to remove it from the mold. To do this, gently tap the mold against a hard surface to loosen the candle. Then, carefully peel away the mold.
Add Finishing Touches
Now that the candle is out of the mold, it is time to add any finishing touches. This could include trimming the wick, adding additional decorations, or applying a sealant to preserve the candle. Once all of the desired touches have been added, the candle is ready to be enjoyed.

Making Pillar Candles: Tips and Tricks for Beginners
When it comes to making pillar candles, there are several tips and tricks that beginners should keep in mind. By understanding these key points, you can ensure your candles turn out looking and smelling great.
Select the Right Wax
One of the most important aspects of making pillar candles is selecting the right wax. Different types of waxes offer different benefits, so it’s important to understand which wax is best suited for your project. For example, paraffin wax is a popular choice for beginners because it is easy to work with, while soy wax is a great option for those looking for a more eco-friendly option.
Understand the Proper Temperature for Pouring
It is also important to understand the proper temperature for pouring the wax. Generally speaking, the wax should be heated to around 160°F (71°C) before being poured into the mold. If the wax is too hot, it could cause the candle to crack. If the wax is too cold, it won’t properly fill the mold.
Use Quality Wicks
Using quality wicks is another important aspect of successful candle making. Poor quality wicks can lead to uneven burning, smoke, and other issues. Be sure to select wicks that are the appropriate size for your candle, and regularly trim the wick to 1/4 inch (0.6 cm) before lighting.
Experiment with Color and Fragrance
Finally, don’t be afraid to experiment with color and fragrance when making pillar candles. Adding a few drops of essential oil or candle scent can give your candle a pleasant aroma, while adding dye or pigment can give your candle a unique look. Have fun and explore different combinations until you find one that you like.

The Art of Craftsmanship: How to Create Pillar Candles
Creating pillar candles is an art form that requires both skill and creativity. With a few basic techniques, you can transform plain pillar candles into works of art. Here are some ideas for crafting specialty candles.
Get Creative with Decorations
Adding decorations to your pillar candles is a great way to make them unique and eye-catching. Glitter, beads, ribbons, and other decorative elements can be used to give your candles a special touch. You can also use stamps or stencils to apply patterns and designs to the candle.
Have Fun with Different Shapes and Sizes
Pillar candles come in a variety of shapes and sizes, allowing you to create candles in any size or shape you desire. You can also combine multiple molds to create layered candles or use a single mold to create a tall, cylindrical candle.
Utilize Unique Techniques
In addition to using decorations, you can also create unique candles with various techniques. Marbling, dipping, and layering are just a few of the techniques you can use to give your pillar candles a one-of-a-kind look. Experiment with different techniques to find the one that works best for you.

Essential Supplies and Equipment for Crafting Pillar Candles
Whether you are a beginner or a seasoned pro, having the right supplies and equipment is essential for successful candle making. Here are some of the essential items you’ll need to get started.
Wax
Of course, the most essential item for making pillar candles is wax. There are many different types of wax available, each with its own set of benefits. Be sure to select wax that is specifically designed for candle making.
Molds
Molds are used to shape the candles and give them structure. There are a variety of molds available in different shapes, sizes, and materials. When selecting a mold, consider the size and shape of the candle you want to create.
Wicks
Another essential item for candle making is wicks. Wicks provide the flame that will light the candle, so it’s important to select wicks that are the appropriate size for your candle. Be sure to regularly trim the wick to 1/4 inch (0.6 cm) before lighting.
Thermometer
A thermometer is an invaluable tool for successful candle making. The wax must be heated to the proper temperature before it is poured into the mold, and a thermometer will help you ensure the wax is at the correct temperature.
Safety Gear
Finally, it’s important to use safety gear when making pillar candles. This includes gloves, goggles, and a mask to protect against any fumes or splashes.
How to Select the Right Wax for Pillar Candle Making
When selecting wax for making pillar candles, there are a few factors to consider. The type of wax, the scent, and the color are all important elements to consider.
Consider the Type of Wax
The type of wax is one of the most important considerations. Different types of wax offer different benefits, such as ease of use, cost, and environmental friendliness. Popular waxes for candle making include paraffin, soy, beeswax, and palm wax.
Consider the Scent
If you want to add a scent to your candle, it’s important to consider the type of scent you want. Essential oils, candle fragrances, and perfume oils are all popular options for adding scent to your candle.
Consider the Color
Finally, consider the color of the wax. Many waxes come in a variety of colors, from natural shades to vibrant hues. You can also add dyes or pigments to create a unique color for your candle.
Pillar Candle Design Ideas for Crafting Specialty Candles
With the right supplies and a bit of creativity, you can create a variety of unique and eye-catching candles. Here are some design ideas to get you started.
Two-Tone Candles
Two-tone candles are created by pouring two different colors of wax into the same mold. This creates a beautiful contrast between the two colors and can be a great way to add a unique touch to your candles.
Embellished Candles
Embellished candles are a great way to add a special touch to your candles. Add glitter, beads, ribbons, or other decorative elements to the outside of the candle to give it an extra sparkle.
Layered Candles
Layered candles are created by combining multiple molds to create a layered effect. This is a great way to create a unique and eye-catching candle.
Textured Candles
Textured candles are created by adding texture to the outside of the candle. You can use a variety of techniques, such as marbling, dipping, and layering, to create textured candles.
Conclusion
Making pillar candles is a fun and rewarding process. With the right supplies and equipment, anyone can craft beautiful and unique candles. Understanding the basics of candle making, such as selecting the right wax, understanding the proper temperature for pouring, and utilizing unique techniques, will help ensure your candles turn out looking and smelling great. Have fun experimenting with different designs and decorations to create one-of-a-kind candles.