
Introduction
Oil lamps have a long history of providing light in the dark. From ancient times until the invention of electricity, oil lamps were used to illuminate homes, workplaces, and streets. Even today, they are still popular as decorative pieces and can be found in many households.
Making your own oil lamp is not only a fun activity, but it also allows you to customize your lamp according to your own style and preferences. It is a simple yet rewarding experience that anyone can do with minimal supplies and tools.
Step-by-Step Tutorial: How to Make an Oil Lamp
Making an oil lamp is easy and can be done in just a few steps. Here is a tutorial on how to make your own oil lamp:
Step 1: Gather Materials
The first step is to gather all the necessary materials. You will need a container that can hold oil, such as a mason jar, glass bowl, or ceramic pot. You will also need vegetable or olive oil, as well as a wick made of cotton string.
Step 2: Prepare the Container
Once you have gathered all the materials, the next step is to prepare the container. If you are using a mason jar, remove the lid and place a small hole at the top of the jar. This hole should be large enough for the wick to fit through, but not so large that the oil can leak out.
Step 3: Fill the Container with Oil
Now it’s time to fill the container with oil. Make sure to fill it up to the same level as the hole you made earlier. Once the container is filled, let it sit for a few minutes to allow any air bubbles to rise to the surface.
Step 4: Insert a Wick
Next, take the wick and thread it through the hole in the container. Make sure the wick is securely in place and that no oil is leaking out of the container.
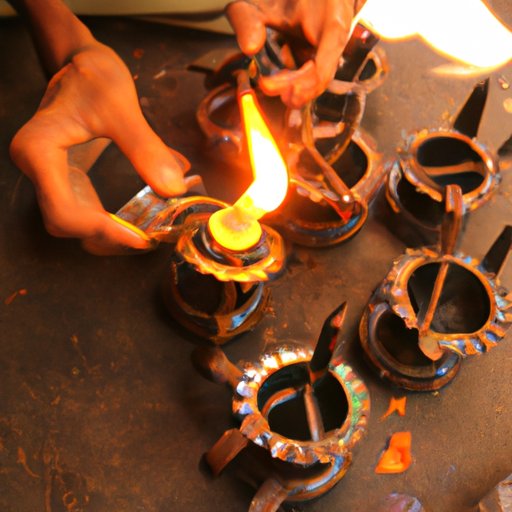
Step 5: Light the Lamp
Finally, light the lamp. Use a lighter or match to light the wick and enjoy the warm, soft glow of your homemade oil lamp.

DIY Guide: Create Your Own Oil Lamp in 5 Simple Steps
Making an oil lamp is a simple process that can be done in just five steps. Here is a guide on how to make your own oil lamp:
Step 1: Gather Necessary Materials
The first step is to gather all the materials you will need to make your lamp. This includes a container to hold the oil, such as a mason jar, glass bowl, or ceramic pot; vegetable or olive oil; and a wick made of cotton string.
Step 2: Prepare the Container
Once you have gathered all the materials, the next step is to prepare the container. If you are using a mason jar, remove the lid and make a small hole at the top of the jar. This hole should be large enough for the wick to fit through, but not so large that the oil can leak out.
Step 3: Fill the Container with Oil
Now it’s time to fill the container with oil. Make sure to fill it up to the same level as the hole you made earlier. Once the container is filled, let it sit for a few minutes to allow any air bubbles to rise to the surface.
Step 4: Insert a Wick
Next, take the wick and thread it through the hole in the container. Make sure the wick is securely in place and that no oil is leaking out of the container.
Step 5: Light the Lamp
Finally, light the lamp. Use a lighter or match to light the wick and enjoy the warm, soft glow of your homemade oil lamp.
Making an Oil Lamp with Household Items
Making an oil lamp doesn’t require any special tools or materials. In fact, you can make a simple oil lamp using items you already have around the house. All you need is a mason jar or other glass container, vegetable or olive oil, and a wick made of cotton string.
To make the wick, cut a piece of string about 10 inches long. Wrap one end of the string around a pencil or pen to form a loop. Dip the loop into the oil and then carefully pull it out. The string should be soaked in oil. Then, thread the wick through the hole in the container and secure it in place.

How to Craft a Beautiful Oil Lamp Using Everyday Materials
Making an oil lamp doesn’t have to be difficult. With the right materials and a little bit of creativity, you can craft a beautiful oil lamp that is sure to impress. Here are some tips on how to craft a beautiful oil lamp using everyday materials:
Selecting the Right Container
The first step is to select the right container for your lamp. Mason jars and other glass containers work great, but you can also use ceramic pots, metal tins, or even empty wine bottles. Just make sure to choose a container that is large enough to hold the oil and has a wide opening for the wick.
Choosing the Right Type of Oil
The type of oil you use for your lamp will affect the flame and the overall look of the lamp. Vegetable or olive oil works best, as they burn cleanly and provide a bright flame. You can also experiment with other types of oils, such as coconut or canola oil.
Crafting a Unique Wick
The wick is an important part of the lamp, as it determines how the flame looks and how much heat is produced. To craft a unique wick, try using multiple strands of string or twine. You can also braid the strings together or tie them in knots for a more interesting look.

The Art of Crafting an Oil Lamp from Scratch
If you’re feeling creative, you can even craft an oil lamp from scratch. This involves finding the right materials, assembling the pieces, and crafting a unique design. Here are some tips on how to craft an oil lamp from scratch:
Finding the Right Materials
The first step is to find all the materials you will need to make your lamp. This includes a container to hold the oil, such as a mason jar, glass bowl, or ceramic pot; vegetable or olive oil; and a wick made of cotton string.
Assembling the Pieces
Once you have gathered all the materials, the next step is to assemble the pieces. Start by making a small hole in the container and threading the wick through it. Then, fill the container with oil and let it sit for a few minutes to allow any air bubbles to rise to the surface.
Crafting a Unique Design
Finally, you can craft a unique design for your lamp. Try adding decorations to the container, such as paint, beads, or ribbons. You can also craft a custom wick out of multiple strands of string or twine. Get creative and have fun!
Conclusion
Making an oil lamp is a simple yet rewarding experience that anyone can do. With the right materials and a few simple steps, you can create a beautiful, custom oil lamp that is sure to impress. Whether you are making a lamp with household items or crafting one from scratch, the possibilities are endless.
We hope this article has been helpful in teaching you how to make an oil lamp.