
Introduction
Radiant floor heating is an energy-efficient way to heat your home. It works by circulating hot water through tubes or electric coils beneath the floor. This type of heating system is becoming increasingly popular due to its energy efficiency and comfort level. Installing radiant floor heating can be a challenging task, but with the right preparation and knowledge, you can successfully complete the installation.

Overview of Radiant Floor Heating
Radiant floor heating is a type of heating system that uses either hot water or electricity to heat the floors of a room or building. The heat is distributed evenly throughout the space, creating a comfortable environment. This type of heating system is energy efficient and cost effective, as it does not require ducts or vents. Additionally, radiant floor heating is safe for children and pets, as it does not emit any air pollutants.

Benefits of Installing Radiant Floor Heating
Installing radiant floor heating can provide a number of benefits. First, it can provide increased comfort, as the heat is distributed evenly throughout the space. Additionally, radiant floor heating can reduce energy bills, as it is more energy efficient than other forms of heating. Lastly, it can improve indoor air quality, as it does not emit any air pollutants.
Step-by-Step Guide to Installing Radiant Floor Heating
Installing radiant floor heating can be a complicated process. However, with the right preparation and knowledge, you can successfully complete the installation. Here is a step-by-step guide to help you get started:
Gather the Necessary Tools and Materials
Before beginning the installation process, make sure you have all of the necessary tools and materials on hand. These include a heat transfer plate, insulation, tubing, and a power source. Make sure to read the instructions carefully and follow all safety precautions.
Plan Out the Installation
Before beginning the installation, plan out where the tubing will go. You should also determine the best location for the power source and calculate the amount of tubing needed for your project. Make sure to mark the locations on the floor so that you know where to install the tubing.
Prepare the Subfloor
Once you have planned out the installation, prepare the subfloor. This includes removing any existing flooring and cleaning the surface. Make sure to inspect the area for any damage before proceeding with the installation.
Install the Insulation
Next, install the insulation. This will help prevent heat loss and ensure that the heat is evenly distributed throughout the space. Make sure to use high-quality insulation for optimal results.
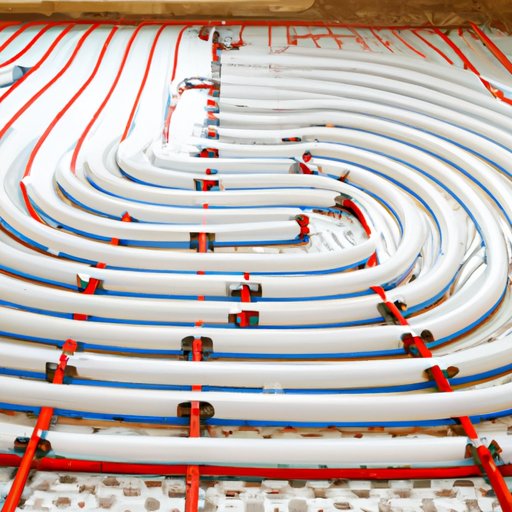
Install the Tubing
Once the insulation is in place, it’s time to install the tubing. Start by connecting the tubing to the power source. Then, lay the tubing in the desired pattern and secure it with fasteners. Make sure to use short runs of tubing to reduce the risk of leaks.
Connect the Tubing to the Power Source
Once the tubing is in place, connect it to the power source. Make sure to follow the manufacturer’s instructions for proper connection. It is important to use the correct wiring and connectors for your particular system.
Test the System
After the tubing is connected to the power source, it is time to test the system. Turn on the power source and check for any leaks or other problems. If everything looks good, you can move on to the next step.

DIY Tutorial for Installing Radiant Floor Heating
If you are planning to install radiant floor heating yourself, there are a few tips and tricks that can help make the process easier. Here are some guidelines to keep in mind when calculating the amount of tubing needed for your project:
- The amount of tubing needed will depend on the size of the room.
- Calculate the total square footage of the room and divide by 50 to determine the amount of tubing needed.
- Use the same calculation for each room you plan to install radiant floor heating in.
When choosing the type of tubing for your project, consider the following factors:
- The type of flooring you have.
- The climate in your area.
- Your budget.
Finally, when determining the best location for the power source, consider the following tips:
- Choose a location that is easy to access.
- Make sure the power source is close to the tubing.
- Pick a spot that is away from furniture and other objects.
Tips and Tricks for Installing Radiant Floor Heating
When installing radiant floor heating, there are a few tips and tricks that can help make the process easier. For example, using a heat transfer plate can help ensure even heat distribution throughout the space. Additionally, using high-quality insulation can help prevent heat loss. Finally, using short runs of tubing can reduce the risk of leaks.
Essential Tools and Materials for Installing Radiant Floor Heating
In order to successfully install radiant floor heating, you will need the following tools and materials:
- Heat transfer plates
- Insulation
- Tubing
- Power source
Benefits of Installing Radiant Floor Heating
Installing radiant floor heating can provide a number of benefits. First, it can provide increased comfort, as the heat is distributed evenly throughout the space. Additionally, radiant floor heating can reduce energy bills, as it is more energy efficient than other forms of heating. Lastly, it can improve indoor air quality, as it does not emit any air pollutants.
Conclusion
Installing radiant floor heating can be a challenging task, but with the right preparation and knowledge, you can successfully complete the installation. Be sure to gather the necessary tools and materials, plan out the installation, prepare the subfloor, install the insulation, install the tubing, connect the tubing to the power source, and test the system. Additionally, use tips and tricks such as using a heat transfer plate, using high-quality insulation, and using short runs of tubing to reduce the risk of leaks. With these tips, you can enjoy the many benefits of radiant floor heating.