
Introduction
Kitchen cabinet handles, also known as knobs or pulls, are an essential part of any kitchen renovation project. They provide a finishing touch that can really make the cabinets stand out. Installing kitchen cabinet handles is a fairly straightforward process, but it does require some careful planning and preparation. In this article, we’ll explore the basics of installing kitchen cabinet handles and provide a step-by-step guide for doing so.
Step-by-Step Guide to Installing Kitchen Cabinet Handles
Installing kitchen cabinet handles is a relatively simple process, but it’s important to do it correctly. Here’s a step-by-step guide to getting it done:
1. Selecting the Right Handles
The first step in installing kitchen cabinet handles is selecting the right handles for your cabinets. There are a variety of styles available, so it’s important to choose ones that match the overall look of your kitchen. Consider the material, shape, size, and finish of the handles, as well as any other decorative elements you may want to add.
2. Prepping the Cabinets
Before installing the handles, it’s important to make sure the cabinet doors are properly prepped. This includes sanding and cleaning the doors, as well as removing any hardware that may be in the way. This will help ensure that the handles fit properly and look good when they’re installed.
3. Marking and Drilling Holes for the Handles
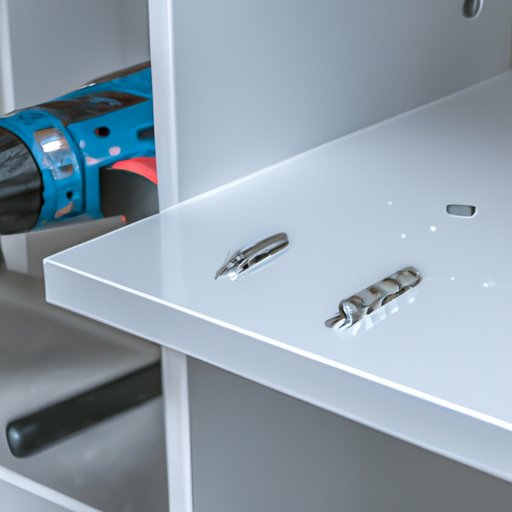
Once the cabinet doors are ready, it’s time to mark and drill the holes for the handles. Measure carefully and use a template or jig to ensure that the holes are drilled accurately. Make sure to use the appropriate drill bit for the material of the cabinet doors.
4. Securing the Handles
Once the holes have been drilled, it’s time to secure the handles. Use the appropriate screws for the material of the handles and make sure to tighten them securely. If necessary, use a countersink bit to create a neat finish on the screws.
DIY Tutorial: How to Install Kitchen Cabinet Handles
Now that you know the basic steps involved in installing kitchen cabinet handles, let’s take a look at a tutorial for doing it yourself. Here’s what you’ll need:
- Screwdriver
- Drill and drill bits
- Tape measure
- Level
- Countersink bit (optional)
- Template or jig (optional)
1. Gather the Necessary Tools
Gather all the tools you’ll need to install the handles. Make sure you have the right type of drill bit and screws for the material of the cabinet doors. Also, consider using a template or jig to ensure accuracy when drilling the holes.
2. Layout the Handles on the Cabinet Doors
Lay the handles out on the cabinet doors to get an idea of where they should go. Take measurements to make sure the handles will fit properly and make any adjustments as needed.
3. Drill Pilot Holes
Once you know where the handles will go, it’s time to drill the pilot holes. Use a drill bit that is slightly smaller than the screws you plan to use. Make sure to drill the holes straight and level.
4. Secure the Handles with Screws
Finally, it’s time to secure the handles with screws. Start by inserting the screws into the pilot holes and then tighten them securely. If necessary, use a countersink bit to create a neat finish.
A Beginner’s Guide to Installing Kitchen Cabinet Handles
If you’re new to installing kitchen cabinet handles, it’s important to understand the basics before diving in. Here’s a beginner’s guide to help you get started:
1. Understanding the Basics of Handle Installation
Before you start installing your handles, it’s important to understand the basics of handle installation. You’ll need to know the size and shape of the handles, as well as the type of screws you’ll need to secure them. Also, make sure you have the right drill bit and template for drilling the holes.
2. Measuring and Cutting the Holes
Once you know the size and shape of the handles, it’s time to measure and cut the holes. Use a tape measure to mark the locations of the holes, then use a drill and the appropriate drill bit to cut them. Make sure the holes are level and straight.
3. Attaching the Handles with Screws
Once the holes have been cut, it’s time to attach the handles with screws. Start by inserting the screws into the holes and then tighten them securely. If necessary, use a countersink bit to create a neat finish.
4. Finishing Touches
Finally, it’s time to finish up the installation. If necessary, add any additional hardware or decorative elements to the handles. Then give everything a final once-over to make sure everything is secure and looks good.

The Easiest Way to Install Kitchen Cabinet Handles
If you’re looking for the easiest way to install kitchen cabinet handles, here are some tips to keep in mind:
1. Choosing the Right Style of Handles
Choosing the right style of handles is key to making the installation process easier. Look for handles that are easy to install, such as those with pre-drilled holes or those that are designed to fit standard cabinet door sizes.
2. Marking the Holes for the Handles
Once you’ve chosen the handles, it’s time to mark the holes for them. Use a tape measure to mark the locations of the holes, then use a pencil to draw a guide line for drilling. Make sure the lines are level and straight.
3. Drilling the Pilot Holes
Next, it’s time to drill the pilot holes. Use a drill and the appropriate drill bit to cut the holes. Make sure the holes are level and straight, and that the drill bit is the right size for the screws you plan to use.
4. Securing the Handles with Screws
Finally, it’s time to secure the handles with screws. Start by inserting the screws into the pilot holes and then tighten them securely. If necessary, use a countersink bit to create a neat finish.

Expert Tips on Installing Kitchen Cabinet Handles
Installing kitchen cabinet handles is not a difficult task, but there are some expert tips that can make the job easier. Here are a few to keep in mind:
1. Use a Template for Accurate Drilling
Using a template or jig when drilling the holes for the handles can help ensure accuracy. This will help ensure that the holes are level and straight, and that the drill bit is the right size for the screws.
2. Consider Using a Jig to Drill Multiple Holes
If you’re installing multiple handles, consider using a jig to drill the holes. This will help ensure that the holes are evenly spaced and the same size.
3. Use a Level to Ensure Even Placement of the Handles
Using a level when positioning the handles can help ensure that they are even and straight. This will help ensure a professional-looking installation.
4. Use a Countersink Bit for a Neat Finish
When securing the handles with screws, consider using a countersink bit to create a neat finish. This will help ensure that the screws are flush with the surface of the cabinet doors.
Quick and Easy Steps for Installing Kitchen Cabinet Handles
If you’re looking for a quick and easy way to install kitchen cabinet handles, here are the steps you’ll need to follow:
1. Measure the Size of the Handles
Start by measuring the size of the handles. This will help you determine the size and shape of the holes you’ll need to drill.
2. Mark the Holes for the Handles
Next, mark the holes for the handles. Use a tape measure to mark the locations of the holes, then use a pencil to draw a guide line for drilling. Make sure the lines are level and straight.
3. Drill the Pilot Holes
Once the holes are marked, it’s time to drill the pilot holes. Use a drill and the appropriate drill bit to cut the holes. Make sure the holes are level and straight, and that the drill bit is the right size for the screws you plan to use.
4. Secure the Handles with Screws
Finally, it’s time to secure the handles with screws. Start by inserting the screws into the pilot holes and then tighten them securely. If necessary, use a countersink bit to create a neat finish.

How to Install Kitchen Cabinet Handles in Minutes
If you’re short on time, here’s how to install kitchen cabinet handles in minutes:
1. Prepping the Cabinet Doors
Start by prepping the cabinet doors. This includes sanding and cleaning the doors, as well as removing any hardware that may be in the way. This will help ensure that the handles fit properly and look good when they’re installed.
2. Drilling the Holes
Once the cabinet doors are ready, it’s time to mark and drill the holes for the handles. Measure carefully and use a template or jig to ensure that the holes are drilled accurately. Make sure to use the appropriate drill bit for the material of the cabinet doors.
3. Attaching the Handles
Once the holes have been drilled, it’s time to secure the handles. Use the appropriate screws for the material of the handles and make sure to tighten them securely. If necessary, use a countersink bit to create a neat finish on the screws.
4. Finishing Up
Finally, it’s time to finish up. Add any additional hardware or decorative elements to the handles, then give everything a final once-over to make sure everything is secure and looks good.
Conclusion
Installing kitchen cabinet handles is a relatively simple process, but it does require some careful planning and preparation. In this article, we explored the basics of installing kitchen cabinet handles and provided a step-by-step guide and tutorial for doing so. We also discussed some expert tips and tricks to make the job easier. Remember to take your time, measure carefully, and use the right tools and materials for the job. With these tips, you’ll be able to install kitchen cabinet handles with ease.