
Introduction
A kitchen sink drain is an essential component of any kitchen setup. It allows water to flow away from the sink area, keeping your kitchen clean and hygienic. Installing a kitchen sink drain may seem like a daunting task, but with the right information and preparation, it can be completed with relative ease. This article will provide a comprehensive guide to installing a kitchen sink drain, covering all the steps you need to take to get the job done quickly and efficiently.
Step-by-Step Instructions for Installing a Kitchen Sink Drain
The first step in installing a kitchen sink drain is to gather the necessary tools and supplies. You’ll need a plumbing wrench, adjustable wrench, screwdriver, plumber’s putty, silicone caulk, and the drain components themselves. Once you have all the necessary materials, you can begin the installation process.
The next step is to remove the old drain. Unscrew the locknut connecting the tailpiece to the drainpipe, then pull out the old drain. Be sure to dispose of it properly.
Next, prepare the area for installation. Clean the sink surface and make sure all the edges are smooth and even. Apply plumber’s putty around the drain opening and spread it evenly, using your fingers. Then, fit the tailpiece into the drain opening and secure it with the locknut.
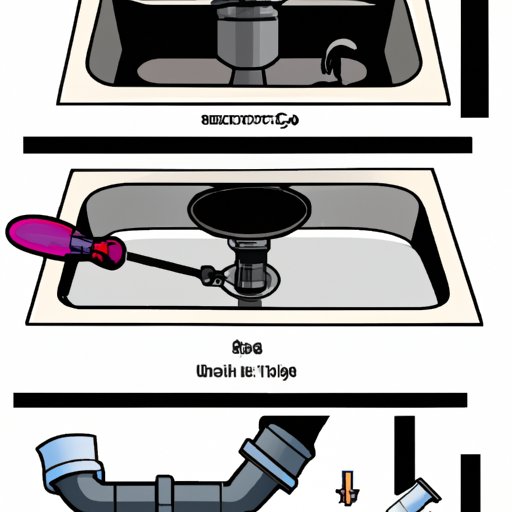
The fourth step is to install the new drain. Place the rubber gasket onto the drain before inserting it into the drain opening. Secure the drain with the mounting ring and tighten it with the adjustable wrench. Then, attach the strainer to the drain and secure it with the screws.
The fifth step is to connect the trap and drain piping. Fit the trap arm into the tailpiece and secure it with the slip nut. Connect the P-trap to the wall drainpipe and secure it with the slip nut. Finally, attach the vent pipe and secure it with the slip nut.
The final step is to test the drain for proper functioning. Run some water down the drain to ensure that it flows freely without any clogs or blockages. If everything looks good, you’re all set! Your kitchen sink drain is now installed.
DIY Guide to Easily Install a Kitchen Sink Drain
Installing a kitchen sink drain may seem like a complicated task, but with the right preparation and guidance, it can be accomplished with relative ease. Here are some tips for getting the job done quickly and efficiently:
- Read up on the installation process before beginning. Familiarize yourself with the steps involved and the tools and materials you’ll need.
- If possible, enlist the help of a friend or family member to assist with the installation.
- Take your time with the installation process. Don’t rush it or you could end up making mistakes.
- Be sure to wear safety goggles and gloves when working with sharp tools or hazardous materials.
- Check your local building codes to ensure that your installation meets all requirements.
In addition to following these tips, make sure to avoid common mistakes when installing a kitchen sink drain. These include not measuring the drain opening correctly, not sealing the drain components properly, and not testing the drain after installation.

The Ultimate Guide to Installing a Kitchen Sink Drain
When it comes to installing a kitchen sink drain, there are several important decisions to make. First, you’ll need to choose the type of drain you want to install. There are two main types of drains: top-mount and bottom-mount. Top-mount drains are easier to install but require more counter space, while bottom-mount drains are more difficult to install but offer more clearance underneath the sink.
Once you’ve chosen the type of drain you want to install, you’ll need to select the right fittings and components. Make sure to purchase the correct size drain components and fittings for your sink. Also, consider purchasing a drain stopper if you want to prevent water from flowing down the drain when the sink isn’t in use.
Finally, you’ll need to troubleshoot any common installation issues you might encounter. If you’re having trouble tightening the locknuts or securing the drain components, try using pliers or a wrench. If you’re having trouble connecting the trap and drain piping, make sure all the connections are tight and secure.

A Comprehensive Tutorial on How to Install a Kitchen Sink Drain
Installing a kitchen sink drain is a relatively straightforward process, but there are a few tricky parts that require extra care. The first step is to gather the necessary tools and supplies, such as a plumbing wrench, adjustable wrench, screwdriver, plumber’s putty, silicone caulk, and the drain components themselves. Next, remove the old drain by unscrewing the locknut connecting the tailpiece to the drainpipe, then pull out the old drain.
Third, prepare the area for installation. Clean the sink surface and make sure all the edges are smooth and even. Apply plumber’s putty around the drain opening and spread it evenly, using your fingers. Then, fit the tailpiece into the drain opening and secure it with the locknut.
Fourth, install the new drain. Place the rubber gasket onto the drain before inserting it into the drain opening. Secure the drain with the mounting ring and tighten it with the adjustable wrench. Attach the strainer to the drain and secure it with the screws.
Fifth, connect the trap and drain piping. Fit the trap arm into the tailpiece and secure it with the slip nut. Connect the P-trap to the wall drainpipe and secure it with the slip nut. Finally, attach the vent pipe and secure it with the slip nut.
Sixth, test the drain for proper functioning. Run some water down the drain to ensure that it flows freely without any clogs or blockages. If everything looks good, you’re all set! Your kitchen sink drain is now installed.

An Illustrated Guide to Installing a Kitchen Sink Drain
If you’re looking for a visual guide to installing a kitchen sink drain, look no further. This guide will provide detailed diagrams and photos of each stage of the installation process. First, gather the necessary tools and supplies, such as a plumbing wrench, adjustable wrench, screwdriver, plumber’s putty, silicone caulk, and the drain components themselves.
Next, remove the old drain by unscrewing the locknut connecting the tailpiece to the drainpipe, then pull out the old drain. Third, prepare the area for installation. Clean the sink surface and make sure all the edges are smooth and even. Apply plumber’s putty around the drain opening and spread it evenly, using your fingers. Then, fit the tailpiece into the drain opening and secure it with the locknut.
Fourth, install the new drain. Place the rubber gasket onto the drain before inserting it into the drain opening. Secure the drain with the mounting ring and tighten it with the adjustable wrench. Attach the strainer to the drain and secure it with the screws.
Fifth, connect the trap and drain piping. Fit the trap arm into the tailpiece and secure it with the slip nut. Connect the P-trap to the wall drainpipe and secure it with the slip nut. Finally, attach the vent pipe and secure it with the slip nut.
Once the installation is complete, you should have a fully functioning kitchen sink drain. Take a look at the photos below for an example of what a finished installation looks like.
Conclusion
Installing a kitchen sink drain can seem intimidating, but with the right preparation and guidance, it can be done with relative ease. This article has provided a comprehensive guide to installing a kitchen sink drain, covering all the steps you need to take to get the job done quickly and efficiently. From gathering the necessary tools and supplies to troubleshooting common installation issues, this guide has it all.
For additional assistance with the installation process, you can consult the resources listed below. With their help, you can make sure your kitchen sink drain is installed correctly and functions properly.