
Introduction
A dryer cord 4 prong consists of four wires that connect an electric dryer to a power source. It is important to properly install a dryer cord 4 prong to ensure a safe and secure connection between the appliance and the power source. In this article, we will provide a step-by-step guide to help you install a dryer cord 4 prong correctly and easily.
Step-by-Step Guide to Installing a Dryer Cord 4 Prong
Before you start installing a dryer cord 4 prong, make sure to familiarize yourself with safety guidelines and disconnect the old cord. Here are the steps to follow to properly install a dryer cord 4 prong:
Safety Guidelines
Before attempting to install a dryer cord 4 prong, make sure to read through any safety guidelines provided by the manufacturer. Make sure to wear protective clothing, such as goggles and gloves, when handling electrical components. Also, make sure to turn off the power supply before starting any work.
Unplugging Old Cord
The first step in installing a dryer cord 4 prong is to unplug the old cord. Disconnect the power source from the dryer by unplugging the cord from the wall outlet or turning off the circuit breaker. Make sure to confirm that the power is off before proceeding.
Connecting New Cords
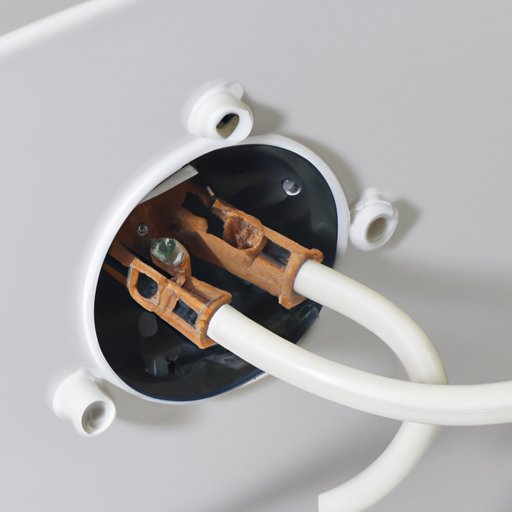
Once the old cord is disconnected, you can now start to install the new dryer cord 4 prong. Start by connecting the ground wire to the green terminal. Then, connect the neutral wire (white) to the silver terminal. Finally, connect the two hot wires (black and red) to the two brass terminals.
Testing the Connection
After connecting the new cord, make sure to test the connection to ensure that it is properly installed. Plug the cord into the wall outlet or turn on the circuit breaker and check for any sparks or unusual noises. If everything appears to be working properly, you can now reassemble the dryer.

How to Easily Replace a Dryer Cord 4 Prong
If you need to replace a dryer cord 4 prong, make sure to follow these steps:
Removing the Old Cord
Start by disconnecting the old cord from the wall outlet or turning off the circuit breaker. Then, remove the screws that hold the dryer cord 4 prong in place. Once the old cord is removed, you can now start to install the new one.
Connecting the New Cord
Now that the old cord is removed, you can begin connecting the new cord. Connect the ground wire to the green terminal, the neutral wire (white) to the silver terminal, and the two hot wires (black and red) to the two brass terminals. Make sure to double check all connections before proceeding.
Securing the Cord
Once the new cord is connected, make sure to secure it in place using the screws provided. Make sure to tighten the screws firmly to ensure a secure connection.
Testing the Connection
Finally, plug the cord into the wall outlet or turn on the circuit breaker and check for any sparks or unusual noises. If everything appears to be working properly, you can now reassemble the dryer.

The Best Way to Install a Dryer Cord 4 Prong
To ensure a safe and secure connection, it is important to follow the best practices when installing a dryer cord 4 prong. Here are the steps to follow:
Choosing the Right Cord
Before buying a dryer cord 4 prong, make sure to check the specifications of the dryer and the power source. Make sure that the cord you choose is compatible with both the dryer and the power source.
Setting Up the Wiring
Next, set up the wiring according to the manufacturer’s instructions. Make sure to properly connect the ground wire to the green terminal, the neutral wire (white) to the silver terminal, and the two hot wires (black and red) to the two brass terminals.
Connecting the Wires
Once the wiring is done, connect the new cord to the dryer and the power source. Make sure to double check all connections before proceeding.
Securing the Cord
Once the new cord is connected, make sure to securely attach it in place using the screws provided. Make sure to tighten the screws firmly to ensure a secure connection.
Testing the Connection
Finally, plug the cord into the wall outlet or turn on the circuit breaker and check for any sparks or unusual noises. If everything appears to be working properly, you can now reassemble the dryer.

A Quick Guide to Installing a Dryer Cord 4 Prong
Here is a quick guide to installing a dryer cord 4 prong:
Preparing the Necessary Materials
Before starting to install the dryer cord 4 prong, make sure to prepare all the necessary materials, such as wire cutters, screwdrivers, and electrical tape. Also, make sure to read through any safety guidelines provided by the manufacturer.
Disconnecting the Old Cord
First, disconnect the power source from the dryer by unplugging the cord from the wall outlet or turning off the circuit breaker. Make sure to confirm that the power is off before proceeding.
Connecting the New Cord
Once the old cord is disconnected, you can now start to install the new dryer cord 4 prong. Start by connecting the ground wire to the green terminal. Then, connect the neutral wire (white) to the silver terminal. Finally, connect the two hot wires (black and red) to the two brass terminals.
Securing the Cord
Once the new cord is connected, make sure to secure it in place using the screws provided. Make sure to tighten the screws firmly to ensure a secure connection.
Testing the Connection
After connecting the new cord, make sure to test the connection to ensure that it is properly installed. Plug the cord into the wall outlet or turn on the circuit breaker and check for any sparks or unusual noises. If everything appears to be working properly, you can now reassemble the dryer.
Tips and Tricks for Installing a Dryer Cord 4 Prong
Here are some tips and tricks to keep in mind when installing a dryer cord 4 prong:
Use the Right Tools
Make sure to use the right tools for the job. Use wire cutters to cut the wires and screwdrivers to secure the cord in place. Also, make sure to wear protective clothing, such as goggles and gloves, when handling electrical components.
Check for Any Electrical Issues
Before installing the new dryer cord 4 prong, make sure to check the dryer and the power source for any electrical issues. If there are any problems, make sure to contact a qualified electrician before proceeding.
Make Sure All Connections are Secure
When connecting the wires, make sure to double check all connections to ensure that they are properly secured. Also, make sure to secure the cord in place using the screws provided.
Test the Connection Before Reassembling
After connecting the new cord, make sure to test the connection to ensure that it is properly installed. Plug the cord into the wall outlet or turn on the circuit breaker and check for any sparks or unusual noises. If everything appears to be working properly, you can now reassemble the dryer.
Conclusion
When installing a dryer cord 4 prong, it is important to follow the right steps and use the right tools to ensure a safe and secure connection. By following the steps outlined in this article, you can easily and safely install a dryer cord 4 prong.