
Introduction
Hanging something from the ceiling is an effective way of adding extra storage space or creating a visually appealing display. Whether you’re looking to add a chandelier to your living room or hang decorative shelves in your bedroom, there are several methods you can use to safely and securely hang items from the ceiling. In this guide, we will explore the different ways you can hang something from the ceiling and provide step-by-step instructions so that you can complete the project with ease.
Utilizing Anchors and Screws
The most common method for hanging something from the ceiling is with the use of anchors and screws. To begin, you will need to choose the right type of anchor for your ceiling material. There are several types of anchors available, including plastic expansion anchors, toggle bolts, and molly bolts. Depending on the weight of the item you are hanging, you may also need to use longer screws or additional anchors.
In addition to the appropriate anchors and screws, you will also need a drill, a hammer, and a screwdriver. Once you have gathered all the necessary tools, you can begin the process of hanging your item.
Step One: Drill a hole in the ceiling according to the size indicated on the anchor package. Make sure the hole is slightly deeper than the length of the anchor.
Step Two: Insert the anchor into the hole and tap it with a hammer until it is flush with the ceiling.
Step Three: Place the screw through the item you are hanging and then insert it into the anchor. Use a screwdriver to tighten the screw and secure the item.
Step Four: If needed, repeat the above steps with additional anchors and screws to ensure the item is securely in place.
Installing Ceiling Hooks
Ceiling hooks are an easy and inexpensive way to hang lighter items from the ceiling. When choosing ceiling hooks, make sure they are rated to hold the weight of the item you are hanging. You will also need to consider the type of ceiling material you have as some hooks require pre-drilled holes while others can be installed without drilling.
To install ceiling hooks, you will need a drill, a screwdriver, and the appropriate screws. Once you have gathered all the necessary tools, you can begin the process of hanging your item.
Step One: Choose the spot where you want the hook to go and mark it with a pencil.
Step Two: Use a drill to create a hole according to the size indicated on the package of the hook.
Step Three: Insert the hook into the hole and use a screwdriver to secure it in place.
Step Four: Attach the item you are hanging to the hook and adjust it as needed.

Creating a Wire Grid System
If you’re looking for a more creative way to hang items from the ceiling, you can create a wire grid system. This type of system is ideal for heavier items such as plants or art pieces. To create a wire grid system, you will need wire, eyehooks, and S-hooks.
In addition to the materials, you will also need a drill, wire cutters, and pliers. Once you have gathered all the necessary tools, you can begin the process of creating your wire grid system.
Step One: Cut two lengths of wire long enough to span the width of your ceiling. Make sure the wires are taut when stretched across the ceiling.
Step Two: Drill two holes in the ceiling at each end of the wires and insert the eyehooks into the holes. Secure the eyehooks with pliers.
Step Three: Attach the wires to the eyehooks and pull them taut. Use wire cutters to trim any excess wire.
Step Four: Attach S-hooks to the wires at desired intervals and hang your items from the hooks.
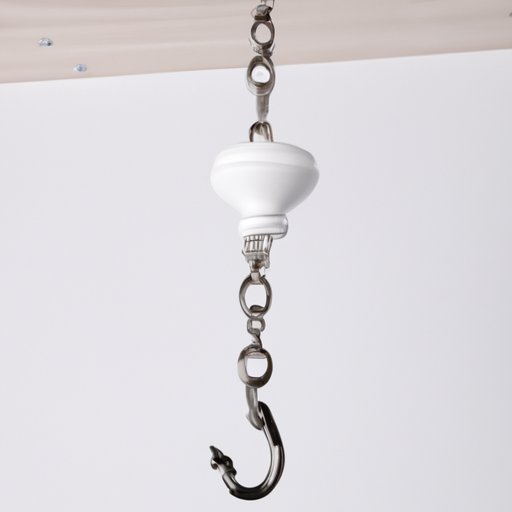
Suspending Items with Chains
Another way to hang something from the ceiling is by using chains. Chains come in a variety of sizes and styles, so you can choose the one that best suits your needs. When selecting a chain, make sure it is rated to hold the weight of the item you are hanging.
To hang something with a chain, you will need a drill, a hammer, and the appropriate screws. Once you have gathered all the necessary tools, you can begin the process of suspending your item.
Step One: Choose the spot where you want the chain to go and mark it with a pencil.
Step Two: Drill a hole in the ceiling according to the size indicated on the package of the screws.
Step Three: Insert the screw into the hole and tap it with a hammer until it is flush with the ceiling.
Step Four: Attach the chain to the screw and adjust it as needed.
Step Five: Hang the item you are suspending from the chain.
Setting up a Pulley System
For heavier items, a pulley system provides a secure and efficient way to hang them from the ceiling. To set up a pulley system, you will need rope, pulleys, and carabiners. You will also need a drill and the appropriate screws.
Once you have gathered all the necessary tools, you can begin the process of setting up your pulley system.
Step One: Choose the spot where you want the pulley to go and mark it with a pencil.
Step Two: Drill a hole in the ceiling according to the size indicated on the package of the screws.
Step Three: Insert the screw into the hole and tap it with a hammer until it is flush with the ceiling.
Step Four: Attach the pulley to the screw and adjust it as needed.
Step Five: Thread the rope through the pulley and tie a knot at the end. Attach a carabiner to the other end of the rope and hang the item you are suspending from the carabiner.
Securing Objects with Adhesives
For lightweight items, adhesives are an easy and reliable way to hang them from the ceiling. There are several types of adhesives available, including double-sided tape, foam tape, and adhesive hooks. Depending on the item you are hanging, you may need to use multiple adhesives to ensure the object is securely in place.
To install adhesives, you will need a ruler, scissors, and the appropriate adhesives. Once you have gathered all the necessary tools, you can begin the process of securing your item.
Step One: Measure the area where you want the adhesive to go and mark it with a pencil.
Step Two: Cut the adhesive to size and remove the backing.
Step Three: Apply the adhesive to the area and press down firmly to ensure it sticks.
Step Four: Attach the item you are hanging to the adhesive and adjust it as needed.

Using a Fishing Line Loop
If you’re looking for a discreet way to hang something from the ceiling, a fishing line loop is a great option. This method is ideal for hanging lightweight items such as paper lanterns or garlands. To create a fishing line loop, you will need fishing line, a needle, and a nail.
In addition to the materials, you will also need a hammer. Once you have gathered all the necessary tools, you can begin the process of creating your fishing line loop.
Step One: Choose the spot where you want the fishing line loop to go and mark it with a pencil.
Step Two: Hammer a nail into the ceiling according to the size indicated on the package of the fishing line.
Step Three: Thread the fishing line through the eye of a needle and tie a knot at the end.
Step Four: Attach the other end of the fishing line to the nail and pull it taut. Tie a knot at the other end and cut off any excess line.
Step Five: Hang the item you are suspending from the loop and adjust it as needed.
Conclusion
Hanging something from the ceiling can be a time-consuming and challenging task, but with the right tools and knowledge, it can be done quickly and easily. Whether you’re looking to hang a chandelier or create a wire grid system, this comprehensive guide has provided step-by-step instructions so that you can complete the project with confidence.