
Introduction
Caulking the edges of your kitchen sink can help prevent water damage and create a more attractive and hygienic kitchen. This article provides a comprehensive guide on how to caulk a kitchen sink, including step-by-step instructions, safety precautions, and expert tips.
Step-by-Step Guide to Caulking a Kitchen Sink
The following steps outline the process of caulking a kitchen sink:
- Gather materials needed
- Prepare the sink for caulking
- Apply caulk around the edges of the sink
- Smooth out the caulk
- Clean up any excess caulk

DIY: How to Caulk a Kitchen Sink in 5 Easy Steps
Before beginning the project, make sure to gather all the necessary materials and tools. You will need caulk, a caulk gun, a utility knife, painters tape, and a damp cloth. Once you have everything ready, follow these five steps to caulk your kitchen sink:
Step 1: Prepare the sink
Begin by cleaning the area around the sink. Make sure that there is no dirt or debris that could interfere with the adhesion of the caulk. Then, use painters tape to mask off the edges of the sink. This will help ensure a clean finish.
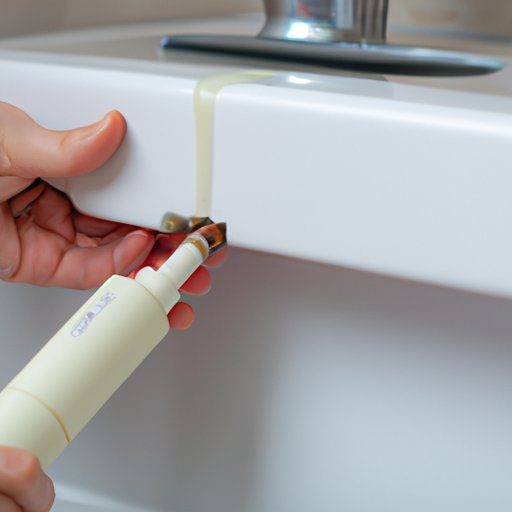
Step 2: Apply the caulk
Load the caulk into the caulk gun, then cut the tip of the tube at a 45-degree angle. Start at one corner of the sink and apply a continuous bead of caulk around the perimeter. Be sure to keep the same pressure and speed throughout the application.
Step 3: Smooth out the caulk
Once the caulk has been applied, use a damp cloth to smooth it out. This will help ensure a better seal and a professional finish.
Step 4: Clean up any excess caulk
Remove any excess caulk with a damp cloth. Make sure to take care not to disturb the caulk that has already been applied.
Step 5: Finish the job
Once the caulk has been applied and cleaned up, remove the painters tape. Allow the caulk to cure for at least 24 hours before using the sink.
A Beginner’s Guide to Caulking a Kitchen Sink
If you are new to caulking, there are a few things you should know before starting the job. Here are some common questions and answers to help get you started:
What is caulk?
Caulk is a type of sealant used to fill gaps and cracks. It is usually made of silicone and is available in a variety of colors.
What type of caulk should I use?
For best results, use a quality silicone caulk. Avoid using acrylic caulk, as it is not as durable and is prone to cracking.
What tools do I need?
You will need a caulk gun, a utility knife, painters tape, and a damp cloth.
Tips for a successful job
- Read and follow the instructions on the caulk packaging.
- Use a quality caulk for the best results.
- Allow the caulk to cure before using the sink.
- Use painters tape for a clean finish.
- Use a damp cloth to smooth out the caulk.

Expert Tips for Sealing Your Kitchen Sink with Caulk
Here are some expert tips to help ensure a successful job:
- Use a quality caulk. Silicone caulk is the best option for a kitchen sink, as it is waterproof and resistant to mold and mildew.
- Allow the caulk to cure before using the sink. The curing time can vary depending on the type of caulk used, so be sure to read the instructions on the packaging.
- Use painters tape for a clean finish. Masking off the edges of the sink before applying the caulk will help create a neat, professional-looking finish.
- Use a damp cloth to smooth out the caulk. This will help ensure a better seal and a more attractive finish.

What You Need to Know Before Caulking a Kitchen Sink
Before beginning the job, make sure to understand the task at hand. Here are some important things to keep in mind:
- Understand the job before starting. Read through this article and research the topic to make sure you know what you’re doing.
- Follow safety precautions. Wear protective gloves and eyewear when using a caulk gun.
- Read and follow instructions on the caulk packaging. Different types of caulk have different curing times, so be sure to read the instructions carefully.
Quick and Easy Tutorial for Caulking a Kitchen Sink
Caulking your kitchen sink is an easy job that can be done in just a few simple steps. Here’s a quick tutorial on how to caulk a kitchen sink:
Preparation
Begin by gathering all the necessary materials and tools. You will need caulk, a caulk gun, a utility knife, painters tape, and a damp cloth. Once you have everything ready, clean the area around the sink and mask off the edges with painters tape.
Applying the caulk
Load the caulk into the caulk gun, then cut the tip of the tube at a 45-degree angle. Start at one corner of the sink and apply a continuous bead of caulk around the perimeter. Be sure to keep the same pressure and speed throughout the application.
Smoothing out the caulk
Once the caulk has been applied, use a damp cloth to smooth it out. This will help ensure a better seal and a professional finish.
Cleaning up the excess caulk
Remove any excess caulk with a damp cloth. Make sure to take care not to disturb the caulk that has already been applied.
Finishing the job
Once the caulk has been applied and cleaned up, remove the painters tape. Allow the caulk to cure for at least 24 hours before using the sink.
Conclusion
Caulking the edges of your kitchen sink is a quick and easy job that can help prevent water damage and create a more attractive and hygienic kitchen. With the right materials and a little bit of know-how, anyone can learn how to caulk a kitchen sink.