

Introduction
Box braiding is a type of hair braiding technique that involves plaiting synthetic or human hair extensions into cornrows. It’s an easy way to achieve a stylish look without having to spend hours in the salon. Plus, it’s also a great way to protect your natural hair from excessive heat damage and breakage.
The best part about box braiding is that you can easily do it yourself in the comfort of your own home. With a few simple tools and some practice, you can create beautiful and professional-looking box braids. In this article, we’ll provide you with a step-by-step guide on how to box braid your own hair, as well as some tips and tricks for creating professional-looking box braids at home.
Step-by-Step Guide to Box Braiding Your Own Hair
Box braiding is relatively easy to do, but it does require some patience and practice. Here’s a step-by-step guide on how to box braid your own hair:
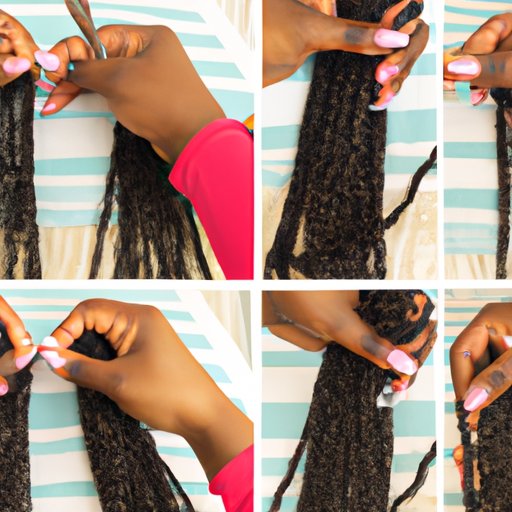
1. Gather the supplies needed. You’ll need a tail comb, a spray bottle filled with water, hair clips, rubber bands, and either synthetic or human hair extensions (depending on the style you want).
2. Section and prepare your hair. Before you start braiding, it’s important to section your hair into small, even sections. Use the tail comb to divide your hair into four sections: two in the front and two in the back. Secure each section with a hair clip.
3. Start with the braid near your forehead. Start by taking a small section of your hair, about one inch wide. Separate the section into three equal parts and begin braiding the three strands together. As you braid, add a small piece of hair extension to each strand. Continue braiding until you reach the end of the section, then secure it with an elastic band.
4. Work your way down the sides of your head. Once you’ve finished the first braid, take the next section of hair and repeat the same process. Work your way down the sides of your head, braiding each section and adding extensions as you go.
5. Finish off the ends of the box braids. When you reach the nape of your neck, finish off the ends of the box braids by twisting them together and securing them with an elastic band. To make the box braids look more polished and professional, you can use a small amount of styling gel to hold them in place.
Tips and Tricks for Creating Professional-Looking Box Braids at Home
Creating professional-looking box braids at home doesn’t have to be difficult. Here are some tips and tricks to help you get the perfect box braids every time:
Choose the right materials. When choosing hair extensions, it’s important to pick ones that are close to the color and texture of your natural hair. This will help ensure that the box braids look natural and blend in with your existing hair.
Use a tail comb to section your hair. Using a tail comb will help you section your hair evenly and accurately. This will make it easier to create the box braids and will also help them look neater and more professional.
Secure each braid with an elastic band. After you’ve finished braiding each section, secure it with an elastic band at the end. This will help keep the braids in place and prevent them from unraveling.
Use a spray bottle to help keep your hair moist. As you’re braiding your hair, it’s important to keep it moisturized. Use a spray bottle filled with water to spritz your hair every few minutes. This will help keep your hair hydrated and make it easier to work with.
DIY Tutorial on How to Create Box Braids in the Comfort of Your Home
If you’re a beginner when it comes to box braiding, it can be helpful to watch a tutorial video. There are plenty of tutorials online that can walk you through the process step-by-step. Watching a tutorial will give you a better understanding of the braiding process and help you create professional-looking box braids.
Once you’ve watched the tutorial, it’s time to practice. Take your time and don’t be afraid to make mistakes – it takes practice to master any skill. And if you ever get stuck or need help, don’t be afraid to ask for assistance.
A Beginner’s Guide to Box Braiding: What You Need to Know
Box braiding is a great way to add length and volume to your hair without having to spend hours in the salon. But before you start braiding, it’s important to understand the basics. Here are a few things you should know before you start box braiding:
Understand the basics of box braiding. Box braiding involves plaiting synthetic or human hair extensions into cornrows. It’s an easy way to achieve a stylish look without having to spend hours in the salon. Plus, it’s also a great way to protect your natural hair from excessive heat damage and breakage.
Choose the right materials. When choosing hair extensions, it’s important to pick ones that are close to the color and texture of your natural hair. This will help ensure that the box braids look natural and blend in with your existing hair.
Have patience and practice. Box braiding requires patience and practice. Take your time and don’t be afraid to make mistakes – it takes practice to master any skill. And if you ever get stuck or need help, don’t be afraid to ask for assistance.
An Easy Guide to Box Braiding Your Hair in Just a Few Simple Steps
Box braiding is relatively easy to do, but it does require some patience and practice. Here’s a quick and easy guide on how to box braid your own hair in just a few simple steps:
1. Gather the supplies needed. You’ll need a tail comb, a spray bottle filled with water, hair clips, rubber bands, and either synthetic or human hair extensions (depending on the style you want).
2. Section and prepare your hair. Before you start braiding, it’s important to section your hair into small, even sections. Use the tail comb to divide your hair into four sections: two in the front and two in the back. Secure each section with a hair clip.
3. Braid the sections of your hair. Start by taking a small section of your hair, about one inch wide. Separate the section into three equal parts and begin braiding the three strands together. As you braid, add a small piece of hair extension to each strand. Continue braiding until you reach the end of the section, then secure it with an elastic band.
4. Secure the ends of the braids. When you reach the nape of your neck, finish off the ends of the box braids by twisting them together and securing them with an elastic band. To make the box braids look more polished and professional, you can use a small amount of styling gel to hold them in place.
Conclusion
Box braiding is a great way to add length and volume to your hair without having to spend hours in the salon. With a few simple tools and some practice, you can easily create beautiful and professional-looking box braids in the comfort of your own home. We hope this step-by-step guide has helped you learn how to box braid your own hair.